")
For many sports live streamers, relying only on the YoloBox touchscreen can be tough in fast-paced broadcasts.
Enter YoloDeck—a dedicated button controller designed to simplify these situations. It’s compact, lightweight, and highly portable, giving you faster, easier control over your YoloBox during high-pressure live events.
Connection
Connecting it is super simple. All you need is a good, stable USB cable—plug it into the YoloBox, and you’re connected. Then, in the Live Event settings menu, you just turn on YoloDeck Configuration, and you’ll enter the button setup interface.
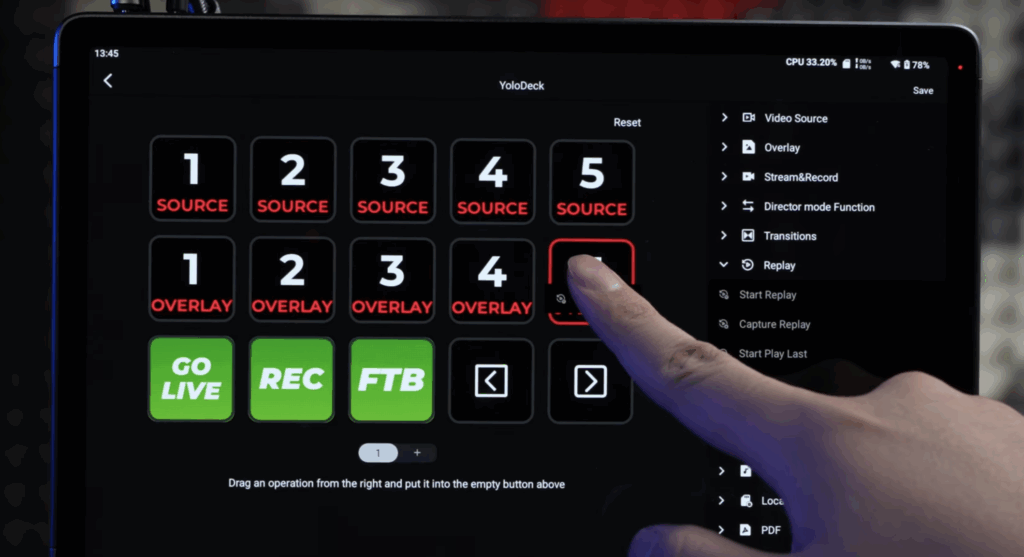
Here, you can drag and drop any function from the menu on the right onto the button grid on the left. You can set up as many button pages as you like, and assign each physical button to control any function you want, giving you full, customized control over your live stream.
How to Use YoloDeck
First, let’s take a look at the basics of using YoloDeck.
Once you enter the YoloDeck Configuration interface, you’ll see the layout divided into two main areas.
On the left, there’s a page of 15 button slots. You can add or remove button pages by simply tapping the plus or minus buttons at the bottom.
On the right, you’ll see the menu of all functions that YoloDeck currently supports—these are the functions you can assign to the physical buttons.
To assign a function to a button, just long-press a function in the right-hand menu and drag it to any button slot on the left. If later you want to remove a function from a button, you can do the same thing in reverse: long-press the function on the button and drag it back to the delete area on the right.
One thing to keep in mind: if you’re assigning a lot of functions and end up with multiple button pages, make sure to reserve space for the page-turn buttons so you can easily switch between pages.
Once all your buttons are assigned, just tap the Save button in the top-right corner. YoloDeck will refresh and save your configuration, and your new control layout will take effect immediately.
Scoreboard
On the YoloBox Extreme, we can first take a look at the Scoreboard control panel.
Now, let’s look at the corresponding buttons on YoloDeck. At this moment, the Scoreboard Display and Time buttons are both green, indicating they are off, while Time Control is shown in blue, indicating a paused state.
It’s important to note that Scoreboard Display, Time, and Time Control have a parent-child relationship. When Scoreboard Display is turned off, pressing Time or Time Control on YoloDeck won’t do anything. You’ll see the same on the Extreme interface—those functions remain gray and inactive.
Once I press the Scoreboard Display button on YoloDeck, you’ll see both YoloDeck and Extreme switch the button from green to red, indicating that the Scoreboard has successfully been turned on.
Next, when I press the Time button, the Time button on YoloDeck switches from green to red, and the Time function on Extreme also switches from gray to red.
At the same time, the Time menu automatically drops down, revealing more detailed controls like Countdown Timer and Time Control.
From here, pressing the Time Control button on YoloDeck starts the timer on Extreme. If you’ve already enabled the Countdown Timer on Extreme, pressing Time Control on YoloDeck will immediately start the countdown.
One thing to note is that currently, YoloDeck does not support turning the Countdown Timer on or off, so you still need to enable it on Extreme via the touchscreen.
As for controlling the scores of the Home and Guest teams, it’s very straightforward. Each team has six buttons for adding or subtracting points, corresponding to ±1, ±2, and ±3.
Replay
The Replay controls are made up of four main buttons, which handle capturing, playing, and pausing replays. But one important thing to note is that before you can control Replay with YoloDeck, you still need to turn on the main Replay switch on Extreme via the touchscreen.
The Replay button works as an instant command. When I press it, Extreme creates a new Replay project and immediately starts playing it in the default order.
At the same time, the Replay button on YoloDeck turns red, indicating that the replay is currently playing. If I press the red Exit Replay button, playback stops immediately.
If I don’t press Exit Replay, once the last replay in the list finishes, Extreme automatically stops playback, and the Replay button on YoloDeck switches back to green, showing that playback has ended.
If I only want to capture a replay without immediately playing it, I can press the Capture Replay button. This will create a new Replay Project on Extreme, which stays in the background and is ready to play later.
For more precise replay capturing, you can use the Mark In function. When I press Mark In, the button on YoloDeck changes to Mark Out, and Extreme starts recording from that moment. Pressing Mark Out ends the recording and adds the captured content to the Replay List as a new project, ready to be played.
To play the most recent replay, you can press the Play Last Replay button. Extreme will automatically play the latest project at the top of the list.
One thing to keep in mind is that after pressing Play Last Replay, the nearby Replay button switches from green to red, indicating that playback is active. If you want to pause the currently playing replay, don’t press Play Last Replay again—instead, press the red Exit Replay button.
Overlays
Now, I’ve added the maximum of 10 Overlay controls to YoloDeck—that’s the current limit it supports. At the same time, we have the Overlays interface open on Extreme, and I’ve added 6 Overlays in the background and renamed them.
You’ll notice that the Overlay numbering on YoloDeck matches the order on Extreme perfectly: Overlay 1 corresponds to the first Overlay on Extreme, Overlay 2 to the second, and so on. The names also update automatically on YoloDeck whenever you rename them on Extreme.
When I press any Overlay button on YoloDeck, the button turns red, and you can see that the corresponding Overlay appears in the Preview area on the left side of Extreme. Press the button again, and it switches back to black, hiding the Overlay on Extreme at the same time.
This setup allows you to quickly and intuitively control multiple Overlays on Extreme directly from YoloDeck, making it easy to toggle them on and off in real time.
Sources
Let’s look at the most commonly used Video Source buttons.
Currently, YoloDeck supports adding up to 10 Video Sources, including MultiView. Just like with Overlays, the button order on YoloDeck matches the order of Video Sources on the Extreme, and the button names automatically update if you rename them on the Extreme. When you press a Video Source button on YoloDeck, it turns red, and the Extreme switches to the corresponding Video Source.
If you’re using PTZ cameras, YoloDeck can also control multiple preset PTZ Positions on Extreme, with support for up to 5 positions.
Next, I’ve switched to a local video, like an ad, which is currently playing. To pause it, simply press the Pause Local Video button on YoloDeck. You can see the video has stopped. Press the button again to resume playback.
For sources that require page flipping, like PDFs or image collections, YoloDeck also supports Next Page and Last Page buttons to navigate through the content.
YoloDeck even supports transitions between sources, including Fade to Black, switching transition modes, and adjusting transition duration. Keep in mind, though, that these settings apply to global transitions—they don’t allow you to set transitions individually for each Video Source.
Audio
Here, it’s important to distinguish between Audio Mixer Settings and BGM Music buttons—the BGM Music buttons are marked with a small red music note in the top-right corner, making them easy to identify.
When you’re about to switch from a commentary feed to the main game view, using audio fade transitions helps make the switch sound smooth and natural. On YoloDeck, the Audio Fade button corresponds to the Audio Fade Settings on your Extreme.
Pressing this button turns it red on YoloDeck, indicating it’s active, and it simultaneously enables Audio Fade Settings on Extreme. Just remember—you still need to set the fade duration on Extreme beforehand.
One thing to note: currently, YoloDeck only supports audio control for the Program channel. You can’t individually turn on or adjust the audio for each video source yet. The volume buttons on YoloDeck let you adjust the PGM volume in 1dB increments, and the same applies for monitoring volume.
Having the right background music can really add storytelling and atmosphere to your sports broadcast. YoloDeck comes with a full set of BGM controls, including Play/Pause, Play Mode, Next/Previous BGM, and BGM volume adjustment, giving you an easy way to manage your background music during live broadcasts.
Stream & Record
YoloDeck lets you start and pause your live stream, as well as start and stop recording. One thing to keep in mind is that the Go Live button on YoloDeck doesn’t automatically start a live stream—it simply controls the live status.
In addition, YoloDeck also has a Full-Screen button and an HDMI Output type switch. When I press the HDMI Out button, you’ll see the HDMI output on the Extreme switch accordingly. Each button corresponds to a different HDMI output source, giving you real-time, synchronized control over what’s being sent out.
Others
The Director Mode Function on YoloDeck is used to control features when your Extreme is in Director Mode. These three buttons correspond to the highlighted control areas you see on the screen.
The Director Transition Method button lets you switch the transition style between Preview and Program, including Cut, Wipe, and Fade.
The Preview to Program button moves the selected Preview video source up to Program, while the previous Program source moves back to Preview.
If you don’t need to switch frequently between multiple video sources during your live, and want to avoid potential errors caused by the default two-way channel between Preview and Program, you can press the Switch Method button to change it to a one-way channel, going only from Preview to Program.
The Auto Switch and VFA buttons correspond to the two Auto-Switch modes on Extreme. Make sure all your video source parameters are set before enabling these functions—otherwise, pressing the buttons won’t have any effect on Extreme.
Finally, YoloDeck also supports Feature/Hide the Comment control. This is extremely helpful for live broadcasts where you want to interact with your audience, as it simplifies the director’s workflow and makes managing live comments much more efficient.
User Experience Sharing
After talking with a number of sports live streamers across different disciplines, we’ve finally summarized a few YoloDeck page layouts that feel the smoothest and most intuitive in real-world use.
Let’s start with a basic live streaming setup. In these scenarios, you usually only need the three core features for sports broadcasts: Scoreboard, Replay, and Overlays. In fact, a single page on YoloDeck is often enough to handle all the operations.
In this setup, the first row of buttons can be dedicated to the Scoreboard: Scoreboard Display, Time, and Time Control. To keep the layout as simple as possible without needing to flip pages, the four slots on the right side can hold just the ±1 point buttons for the Guest and Home teams.
The remaining 8 buttons can be used for Replay and Overlays.
If you prefer one-touch replay capture and immediate playback, you can put only the Replay button in the second row.
If you’d rather capture replays to the background first and decide later when to play them, you can place Capture Replay, Play Last Replay, and Replay buttons there. And if you want more precise replay capture, the second row can hold Mark In, Play Last Replay, and Replay buttons.
The third row, with its 5 buttons, is perfect for Overlays—easy to see and quick to control.
For more complex live streaming setups, you might need multiple button pages on YoloDeck. In that case, you can put other function buttons—like Video Source, BGM, etc.—together with Replay and Overlays on one page, and dedicate a separate page for the Scoreboard.
When arranging buttons, a good rule of thumb is to prioritize based on usage frequency and function category. Buttons you use most often should be placed up front. Overlays usually go at the bottom.
And try to group similar functions together—this not only makes it easier to find what you need but also improves workflow efficiency and keeps your live broadcast running smoothly.
2,344 total views, 23 views today