Live streaming on X (formerly Twitter) is a powerful way to connect with your audience in real time. But before you go live, there’s an important update to be aware of: you must now have a verified X Premium subscription to stream live on X. This is a recent requirement added by the platform to enhance content quality and security. You can learn more about it here.
Once your account is verified and ready, the process of finding your stream key and RTMP URL is simple. In this blog, you’ll learn the exact steps to locate your X stream key and URL, and how to set up your stream using YoloCast—quickly and clearly.
How to Get Your X (Twitter) Stream Key & URL
Follow these steps to locate your stream key and URL on X:
- Log in to your Twitter account and go to X Media Studio.
- Click on “Sources.”
- Click “Create Source” in the top right corner.
- Give your new source a name. Make sure RTMP is selected, and choose your region based on where you’re streaming from. Then click Create.
- You’ll now see your RTMP stream key. Copy the RTMP stream URL and stream key—you’ll need them in your streaming software later.
That’s it—you’ve linked your source!
How to Stream to X (Twitter) with YoloCast
Once you have your X stream key and URL, you can go live with YoloCast. Here’s how:
- Log in to YoloCast. New users get a 14-day free trial. For a plan trial, please email hazelhe@yololiv.com.
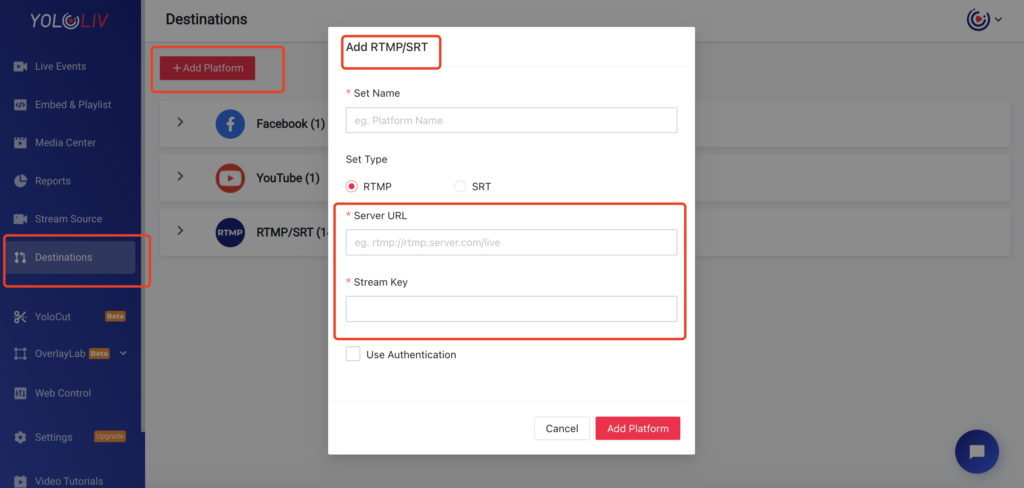
- Navigate to “Destinations“ in the dashboard.
- Click “Add Platform.”
- Choose “RTMP/SRT” as the platform type. Give your platform a name, like “X RTMP.”
- Paste in the stream URL and stream key that you copied earlier from X.
- Click ”Add Platform” to save it.
- Go back to “Live Event.”
- Click “Create Live Event.”
- Fill in the event title, description, thumbnail, trailer, and all necessary information that is needed.
- For Destination, choose the X RTMP platform you just added.
- Click “Create” once everything is filled in.

Set Up the Broadcast on X Media Studio
- Go back to X Media Studio Producer.
- Click “Broadcasts” in the menu.
- Click “Create Broadcast.”
- Enter your broadcast name, description, and add an image.
- Under “Source,” select the stream source you created earlier.
Going Live
Once everything is set:
- Start the stream from YoloCast.
- Your video will automatically stream to X (Twitter) using the RTMP source.
Conclusion
Streaming to X (Twitter) doesn’t have to be complicated. With the right tools like YoloCast and clear steps, anyone can go live in minutes. Whether it’s for business, entertainment, or personal use, this blog helps you get started with ease.
32,302 total views, 11 views today

Hailey, a Customer Success Specialist at Yololiv, she brings immense enthusiasm to assisting users in understanding the various features of YoloCast and resolving any usage-related issues they may encounter. Alongside her support efforts, she also curates articles sharing tips, troubleshooting advice, and other helpful insights to enhance users’ experience with YoloCast.


