Now, many of you probably already know that this feature is designed for connecting remote guests, but it’s also perfect for situations where you need to wirelessly input video sources into YoloBox from across the city, whether that’s through a mobile camera or a webcam from your computer. The best part? Video sources coming through “Invite Guests” support up to 1080p60 resolution and frame rate, so the quality is really great.
But before we go any further, let me first explain how the new “Invite Guests” feature is different from the old version.
Differences
In the new version of the Invite Guests control interface, you’ll notice that the button options are much more streamlined and intuitive. We’ve merged the old “Mute Audio by Default” and “Allow to Join” switches into the “Enable Invite Guests Function” button. This change makes the operation more convenient and also resolves conflicts with other control functions.
We’ve also optimized the process to avoid the need to constantly switch to the Audio Mixer interface to control guest audio in real time. In the past, switching back and forth could make the process feel clunky, especially when a guest joins midway, leaving the main studio in an awkward position of having to manually add a PiP layout during the live stream.
To eliminate these unexpected situations, we’ve added a guest seating arrangement to the Invite Guests control interface. Now, you can set up the video source and audio layout for each guest in advance. Once the guest joins, their video will automatically be assigned to the pre-set seating, and controlling the audio is much more straightforward.
Another exciting feature in this version is the simplified guest connection process. In the old version, inviting a guest meant entering their email address in YoloBox, sending an invite link, and then having the guest open their email, click the link, fill in their information, and join the stream—this was a bit of a hassle. Now, we’ve added a QR code scanning option. All you need to do is scan the QR code on your device with your phone, and you can instantly grab the invite link and share it with your guests, saving a lot of time and trouble.
I recommend that you first enable the “Enable Invite Guests Function” button, set up all your parameters in advance, and then proceed with inviting guests. Next, I’ll walk you through the detailed steps for both “Enable Invite Guests Function” and “Invite Guests” to make sure you’re all set.
Enable Invite Guests Function
In the latest version, the system still supports adding up to 5 Guest sources at the same time, and you can adjust the number of participants through the “Maximum Participants” option.
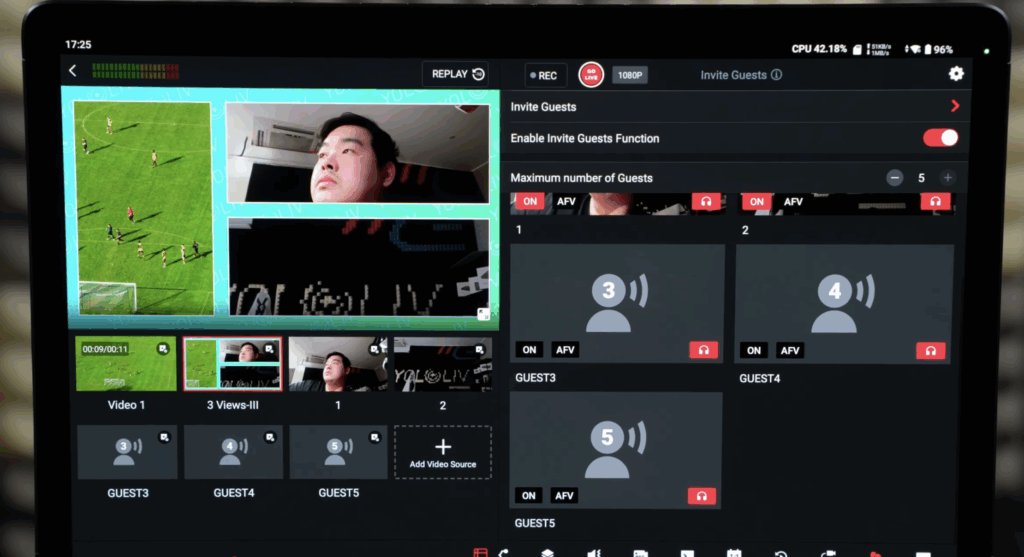
Each Guest seat will be clearly numbered, and guests will automatically be assigned to seats based on the order they join. Each seat has its own audio control buttons, including the audio channel switch, AFV, and Mix Minus. By default, when a guest joins, they will be muted, AFV will be off, and Mix Minus will be enabled to avoid any unexpected audio interference during the live stream.
It’s important to note that if you want to adjust a guest’s volume more precisely, you will still need to go to the Audio Mixer control panel and adjust the volume for the corresponding audio channel.
Additionally, in the bottom left corner of the Video Source list, you can see the preset Guest seats. By simply tapping “Add Video Source” and choosing the appropriate Multiview layout, you can add these Guest seats to the screen as a video source in advance. This way, you won’t need to scramble to add Multiview layouts while the stream is live. It makes the whole process much smoother and more efficient.
Invite Guests
Alright, let’s start by talking about the traditional method. First, tap on the “Invite Guests” button. If you just want to use this feature to wirelessly input video from your smartphone camera, you can simply press “Send a link to me.” If you’d like to invite others to join, you can enter the guest’s email address here and then tap “Send.”
Next, here’s what your guest will need to do. They’ll receive an email from YoloLiv, which includes the invitation link. The guest will click that link, enter their name, make any basic adjustments they need in the main studio, and then tap “Join” to join the live stream. We recommend using Chrome or Safari to open the invitation link.
Once the guest sends their join request, the main studio will receive it, and you’ll be able to see their camera feed and other info on the YoloBox Extreme. Once you confirm, the guest’s video feed will officially join the live stream. Now, here’s a small improvement we made from the old version: In the previous version, the join process was a bit more involved. The main studio would first need to enable “Allow to Join,” and then the guest would click “Join” to enter. But now, in the new version, the main studio always has the final control over the guest source, making it much more streamlined and efficient.
Now that’s the traditional way to connect guests. Let’s move on to the new method. This one requires a phone with scanning capabilities.
Right below where you input the email address, you’ll see a big QR code. All you need to do is open your phone’s scanning feature, scan the QR code, and it will directly open the invitation link. This skips all the extra steps of entering an email, communicating with the guest, and helping them find the invitation link. It cuts down on a lot of communication hassle. You can just share the link with the guest, and they can click it to join the live stream directly.
2,616 total views, 3 views today