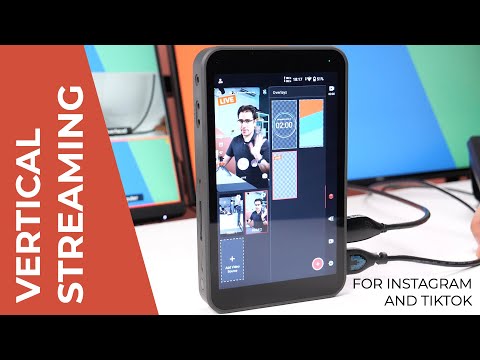
Our favorite YouTuber and AV industry veteran Aaron Parecki has released a review on Instream and made a brief introduction on its tech specs, key features, and more. Let’s see what he’s gotta share about this industry-leading vertical streaming studio.
Intro
This is the Instream—the first dedicated device for doing vertical multi-camera live streams on Instagram and TikTok.
Before we dive in, I need to first mention that Yololiv sent me this pre-production model and I’ve had a few weeks to try it out and do some live streams on my Instagram account, but they don’t get any input into what I say in this video, and they don’t get to watch this video before I post it. So with that out of the way, let’s carry on.
First of all, what is the Instream encoder?
According to their website, this is an all-in-one multi-camera vertical live streaming studio.
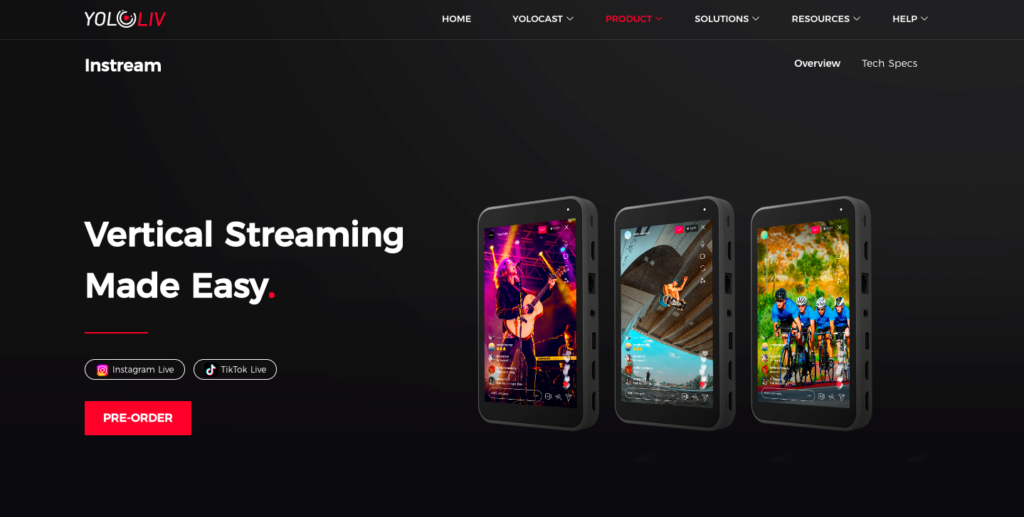
This lets you do livestreams on Instagram and TikTok where you can switch between multiple cameras and even add graphics and other effects.
Why is Instream Important
Instagram only lets you live stream from the Instagram app itself. They don’t provide a way to let you live stream from software like OBS or hardware like an ATEM Mini.
I know you’re probably thinking, “but I’ve seen third-party apps for live streaming to Instagram.” Yes, there are some solutions out there that will give you a way to find the RTMP URL for your Instagram account.
It’s against Instagram’s terms of service to use tools like that, and that means you run the risk of getting your entire Instagram account shut down.
You run the risk of Instagram shutting down your entire account, not just the live stream. And if you get your account shut down, there is basically nothing you can do to get it back. So that is why I would definitely not encourage you to use those third-party tools for streaming to Instagram.
So what does Instream do that avoids this issue?
Well, basically, it’s an Android device that runs the Instagram app directly. So as far as Instagram is concerned, there is one camera built into the device It’s just that this camera happens to be a kind of virtual camera that lets you combine multiple cameras into the one that Instagram sees. The device also ships with the TikTok app installed, and they are planning on adding more apps in future software updates.
Setting up Instream
So let’s take a look at what it takes to get this all up and running, starting with all the ports on the device.
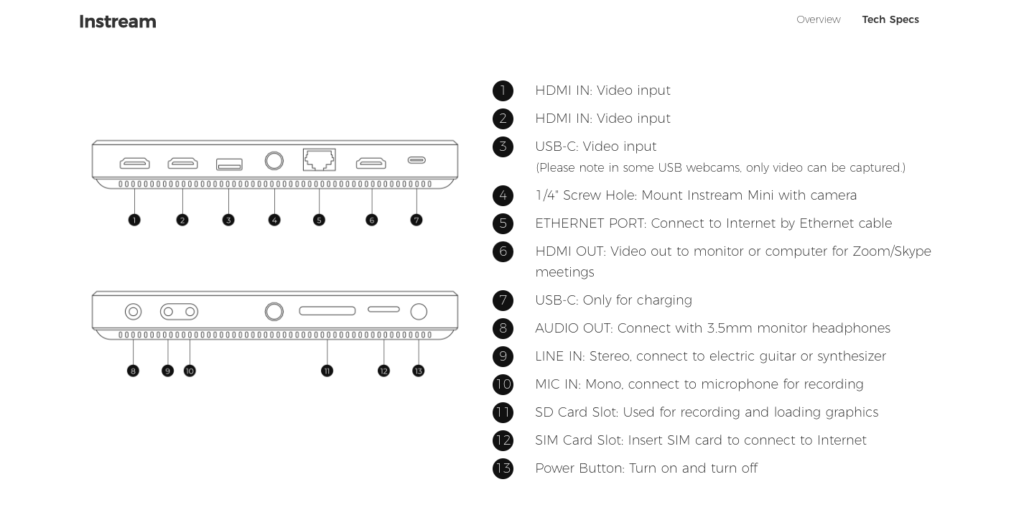
First of all, on the right side of the device, we’ve got two HDMI input ports. That’s for your two HDMI cameras, a USB port for connecting webcams over USB. This is a 1/4″ tripod mount. This one is the ethernet jack to plug in a wired internet connection, which is a lot more reliable than wireless. But it does have wi-fi and even a SIM slot built in. This is an HDMI out which you can use to feed another monitor if you want to see yourself larger. This is for the USB-C power adapter.
On the left side we’ve got a few other ports.
Power button is down here. This is a slot for a SIM card so you can provide it a cell connection. This is for an SD card, which is where you’ll load your graphics, and it can also record to the SD card if you want. Another quarter inch tripod mount. This is the line and mic-in for your audio so you can connect external audio interfaces or a microphone. And this is a headphone jack so you can hear yourself.
So to get things going, you’re going to first need to connect at least one camera.
You can use a nice camera with a good lens, rotate it on your tripod, and you’ll already get a much better quality picture than your phone’s built-in camera.
You can connect two HDMI cameras and also a USB camera. The only trick here is you do have to physically rotate your cameras to be vertical, so make sure you use a tripod with a ball head that can go into vertical mode.
Personally, I don’t think there’s much of a reason to use this with USB cameras, since the quality of the DSLR or mirrorless cameras is just so much better than any USB webcam right now. And most USB webcams aren’t even any better than your phone anyway.
So now we’ve got two HD cameras connected and next, we need to handle audio. This is another benefit of using this over just your phone because you can use much better microphones than the built-in phone mic. That can be either a nice overhead microphone or a wireless microphone like the DJI mic.
You can connect a microphone to the mic jack, or you can run an external mixer into the line jack. Or to keep things simple, you can connect your microphone to your camera. So now that your cameras and microphone are connected, it’s time to boot this up.
Press the power button on the side for a couple of seconds and it will start to boot up. If this is your first Yololiv device, you’ll need to create an account But if you already have a YoloBox, then you can actually log in with the same account.
Once you log in, you’ll be taken to the main screen here where you can see the Instagram and TikTok apps are already installed. Right now it ships with only Instagram and TikTok, but they are planning on adding support for more apps in the future.
Overview of Instream Software
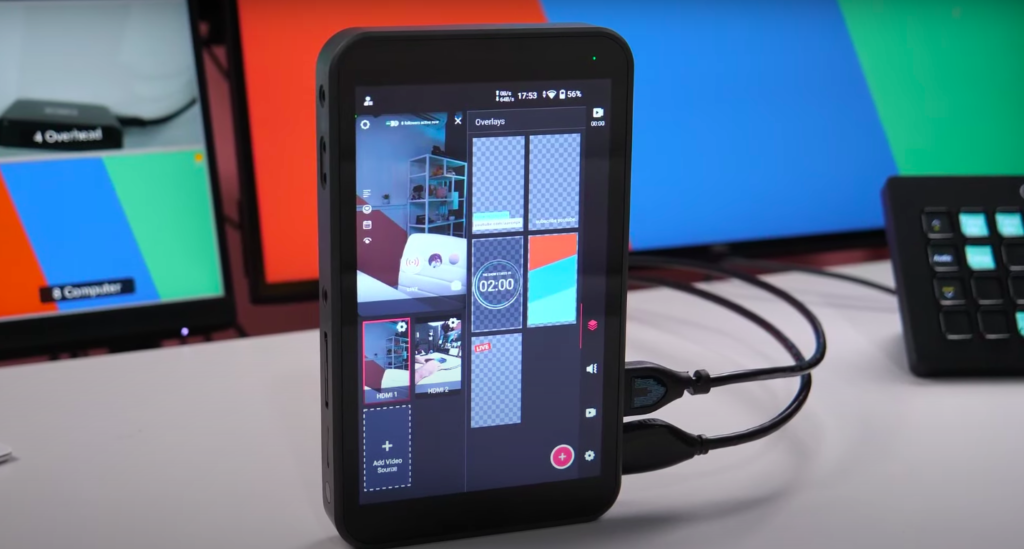
Around the sides here is the user interface for the Instream software. This is showing me the two cameras that I’ve got connected and now I can switch between them just by tapping.
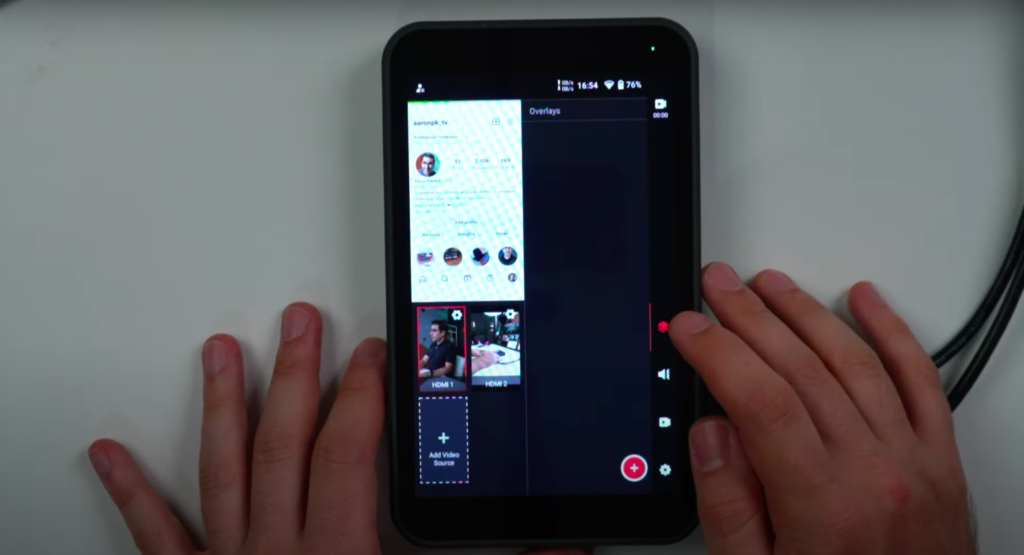
Along the right side are all the settings for things like audio or creating graphics, and there are a bunch of other settings on the device as well. So to show you how this works, I’m going to first tap on the new post button and then click live.
This is now showing me a preview of the camera, but the real magic is that I can now tap to change between the two different cameras. And as far as Instagram is concerned, it’s the same camera.
Instagram Livestream Test
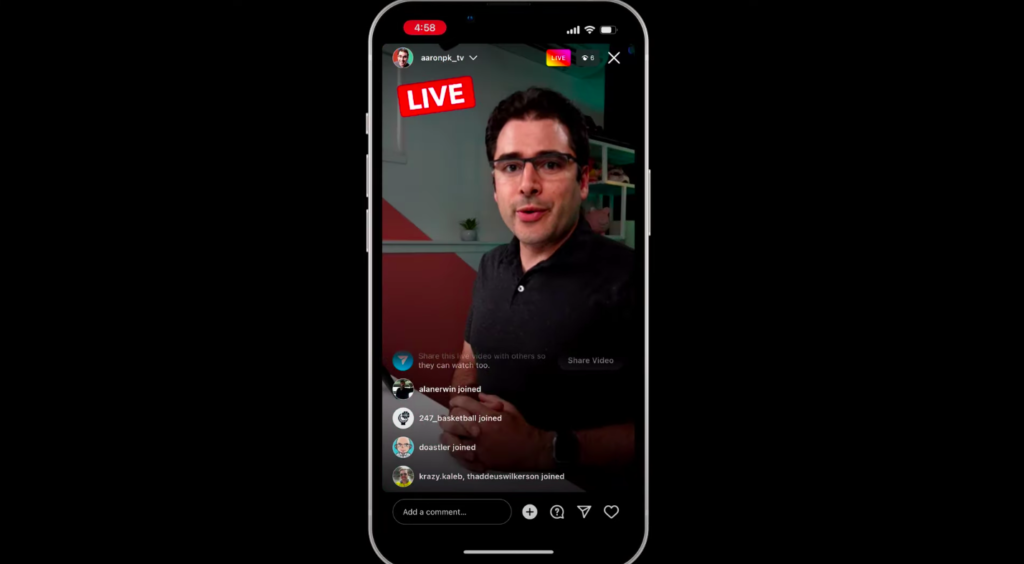
Let’s actually do a quick Livestream right now just to try this out. I am doing a quick test of the live streaming from the Instream live stream encoder.
So is this only for Instagram? Is it a good YoloBox replacement?
It is a special device only for this. It does not run the regular YoloBox software, and it is vertical. So that was a fun little live demo of testing that live streaming to my actual Instagram account. And if you’re following me on Instagram, you will have gotten that notification that I was live.
So now I want to show you some of the more advanced features. There’s a lot more you can do.
You can do things like creating picture and picture or play back SD card videos, or adding graphics on top of the video as well.
How to Create a Picture-in-Picture Layout
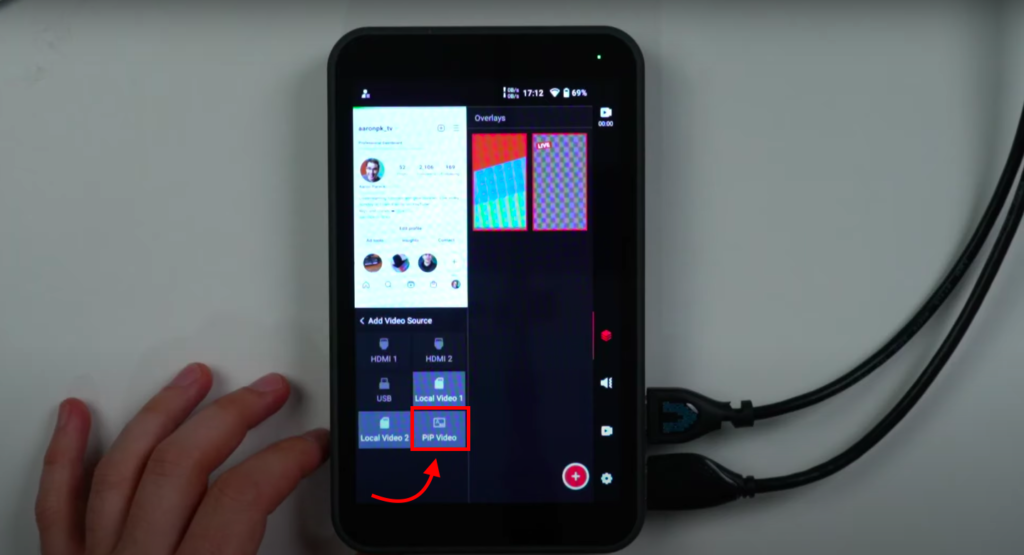
First, we’re going to make a new picture-in-picture layout. So click on this add video source, then click on picture and picture video.
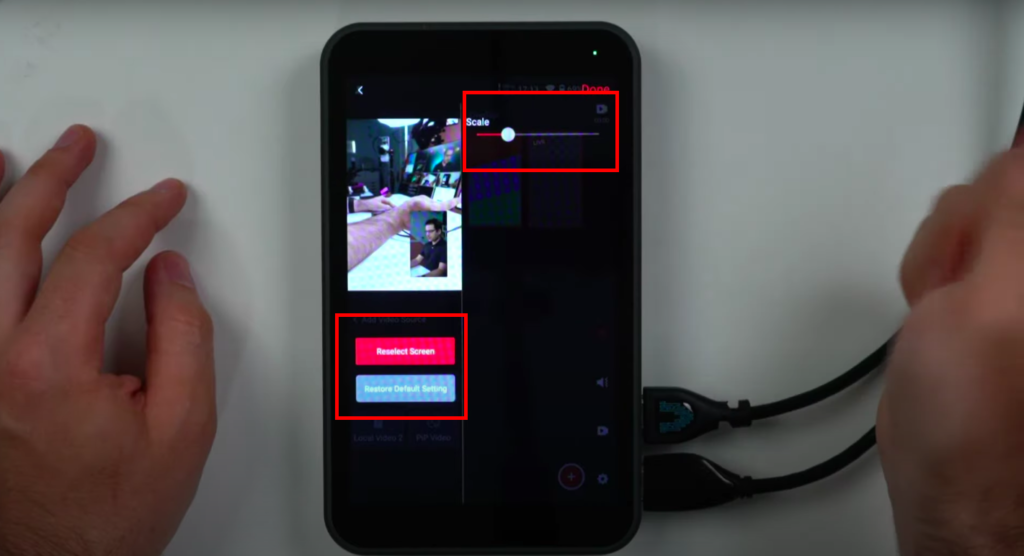
Choose the two sources you want to use for the picture-in-picture. The first one you tap will be the background. The second you tap will be the smaller one. I can also change the scale in case I wanted to shrink it down to make it even smaller.
And now I can change between these two cameras as well as the picture-in-picture view.
How to Greenscreen
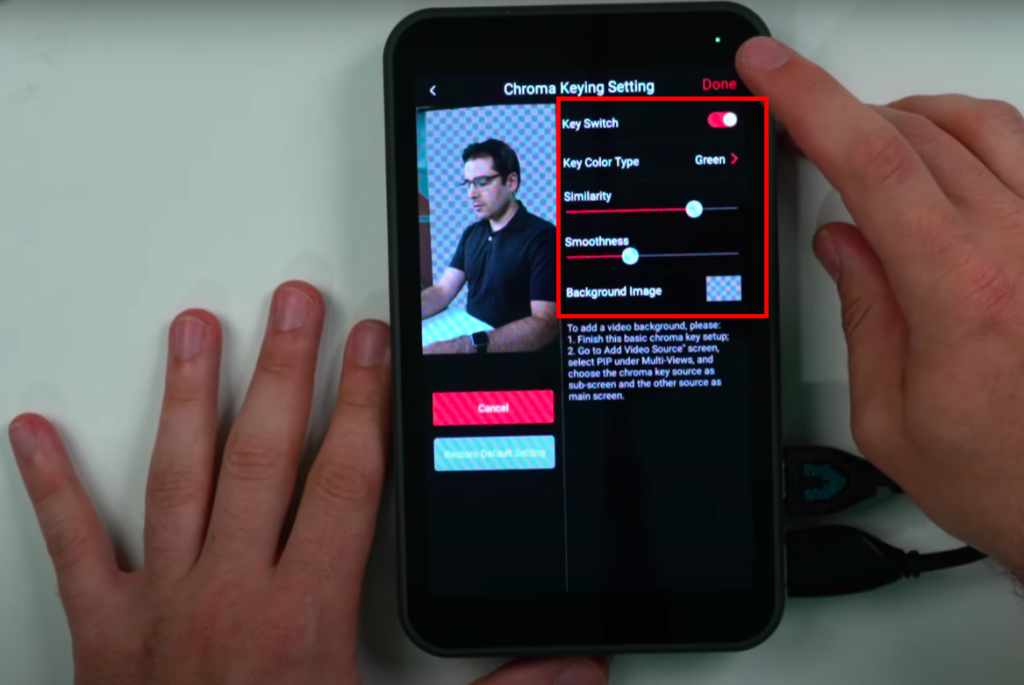
To do the green screen on the Instream, first set up your green screen, and make sure you light it properly.
Then tap on the gear of the camera you want to key out. Tap on chroma keying and then just tap this key switch.
Now you can see it’s already done a really good job of removing the background green. If you want this to go on top of a background image, go ahead and choose that now. And you can see it’s doing a pretty good job of keying me out and putting me on that background image.
If I wanted to key myself on top of a background video, then instead let’s go ahead and go back into the chroma key menu, get rid of the background image, and we’re just going to go ahead and click done.
So now you can see it’s just black in the background because it’s transparent. But here’s the trick. I’ll go ahead and click add video source, choose picture-in-picture.
I’ll go ahead and make it full size and then I can put it in front of that for example. Click done. And now again you can see it shows up at the bottom as another camera angle to switch to. And again, it’s doing a really good job of keying that out.
Adding Graphic Overlays
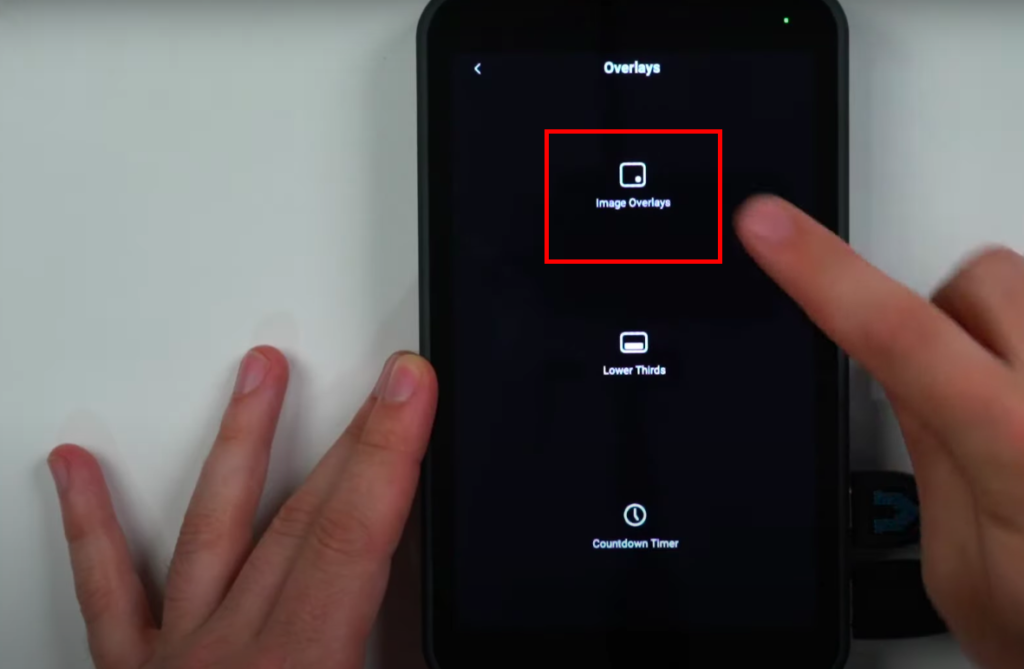
In this first tab, this is where you get to create your overlays, both graphics as well as titles. You can add images and add them onto the screen whenever you want.
You will first have to save those onto the SD card and then you can load images in from the SD card. So go ahead and click the plus, then choose image overlays. And these are the images that are on my SD card. I’ve got a couple of versions of the background. I got my little live thing for the corner. I’ll go ahead and click this live icon, you can see here it’ll let you scale it. So I want this to be a little bit smaller and maybe up in the corner. Click done, and now it shows up here, and when you tap it, it just puts it onto the screen.
Creating Lower Thirds
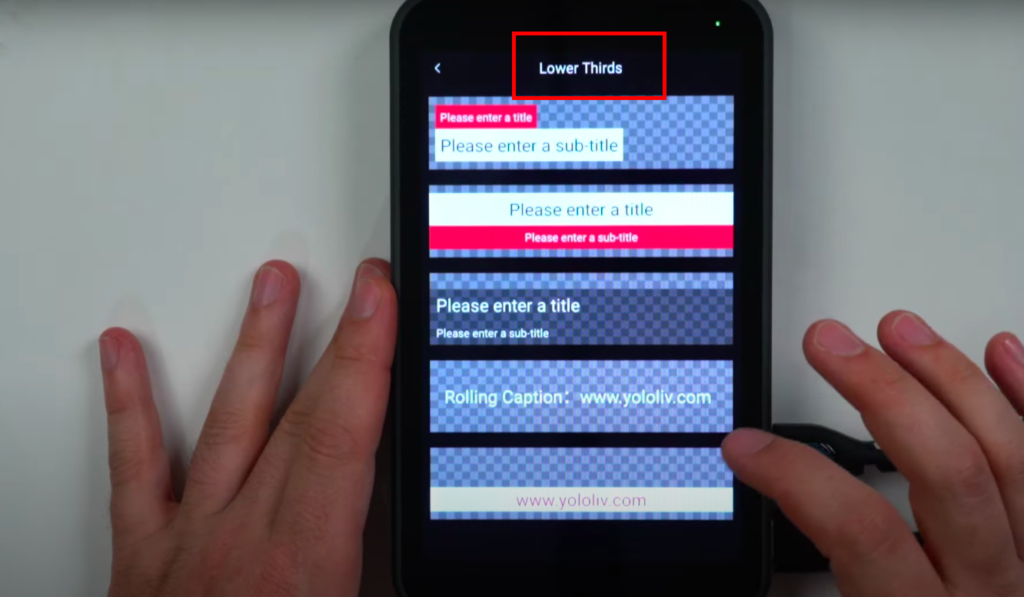
Now let’s take a look at creating lower thirds. Again, click that plus, tap lower thirds, and these are the presets that you get. You get a couple of different versions and you’ll be able to change things like the colors and the fonts. So here you can choose where to put it on the screen. Let’s put it down at the bottom. You get two lines of text. You can choose the size of the top part. The size of the bottom part can change the colors. Let’s use maybe that one title color. Let’s make it dark.
Go back. Subtitle font, you get a couple of different fun options of fonts to choose from.
Click done, and now it shows up again like the rest where you can just tap it to bring it on the air. Some of the other lower thirds formats include a rolling caption in case you want it to just scroll along the bottom all the time, and when you tap that, it’ll start scrolling across the bottom of the screen.
Adding Countdown Timers
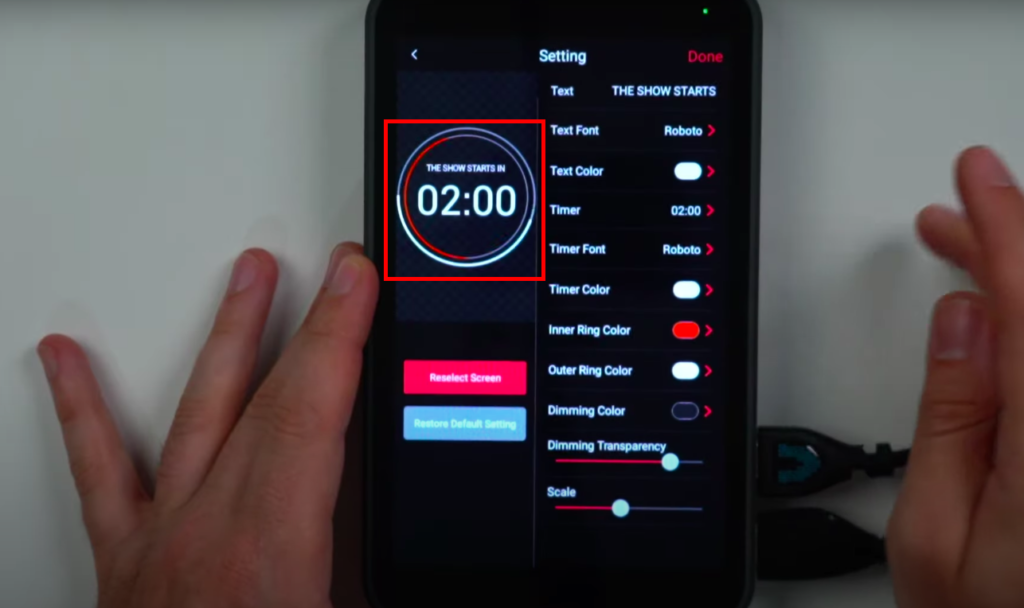
Another really cool one is a countdown timer. So you actually have the option of creating a countdown timer that you can overlay in order to have something on the screen before you start going live. You can choose how long you want to start.
You can again choose the different colors. So let’s make this that that teal blue and you get to choose the fonts again and all that kind of thing. So if you want it to be overlayed on top of your video or another background image, you can choose how much you want it to darken that here. So I’ll make it kind of light because we’re going to put it over the background image. Click done. So now before I’m ready to go live, I can go and put the background image and then add the countdown timer. And this way when I hit Go Live, Instagram is going to start telling people I’m live, but it’s not going to send it out to everybody all at once.
People will start trickling in while you’re getting ready. And when you’re ready to go live, you can take these off.
Playing Back Recorded Videos
Another useful thing is to be able to play back recorded videos from the SD card.
Of course, you’re going to want to make sure you’ve created a vertical video file to playback, but it actually can handle regular horizontal clips too. They’ll just be smaller on the screen.
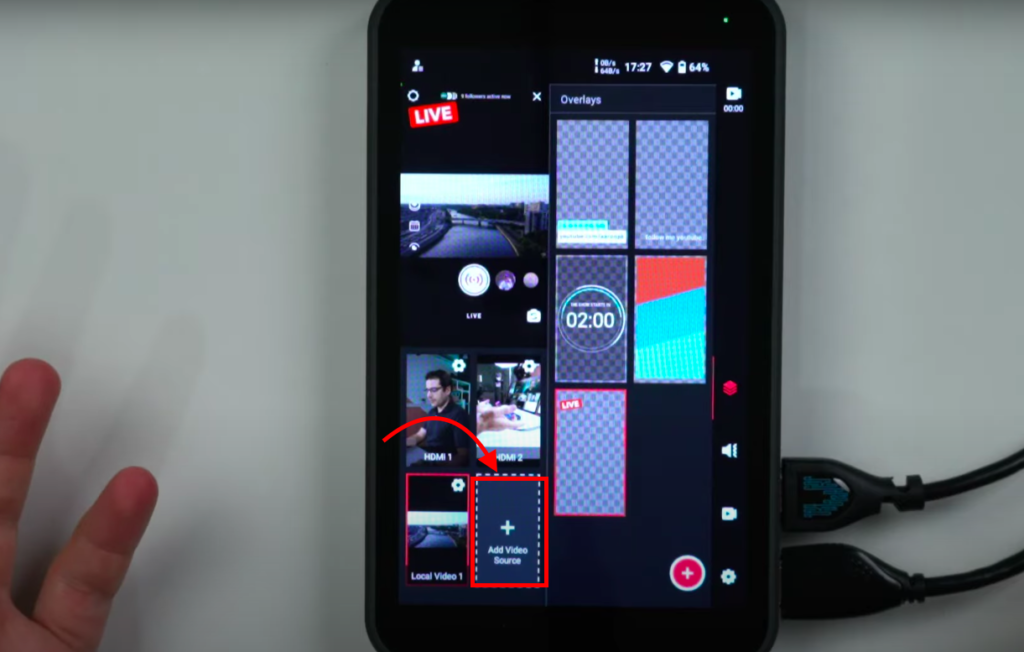
So again, make sure you save the clips onto the SD card and then click add video source, click local video one. And this is the file I’ve got on my SD card right now. This shows up just like another camera that you can switch to and it’ll start playing as soon as you switch to it. You can also create a picture in picture layout with the recorded video.
There are a couple of options for SD card video playback. Let’s take a look at those really quick. Go into the settings here, click SD card video switching and you can choose whether you want it to resume first frame and pause when switching.
So we’ll go back to the beginning or just continue playing wherever it happens to be or pause when you switch away. So if you do have a vertical video created that you can actually switch to it and use it as like a pre-roll or an outro segment. Or if you just have a horizontal video, you can play it on top of your main video.
Audio
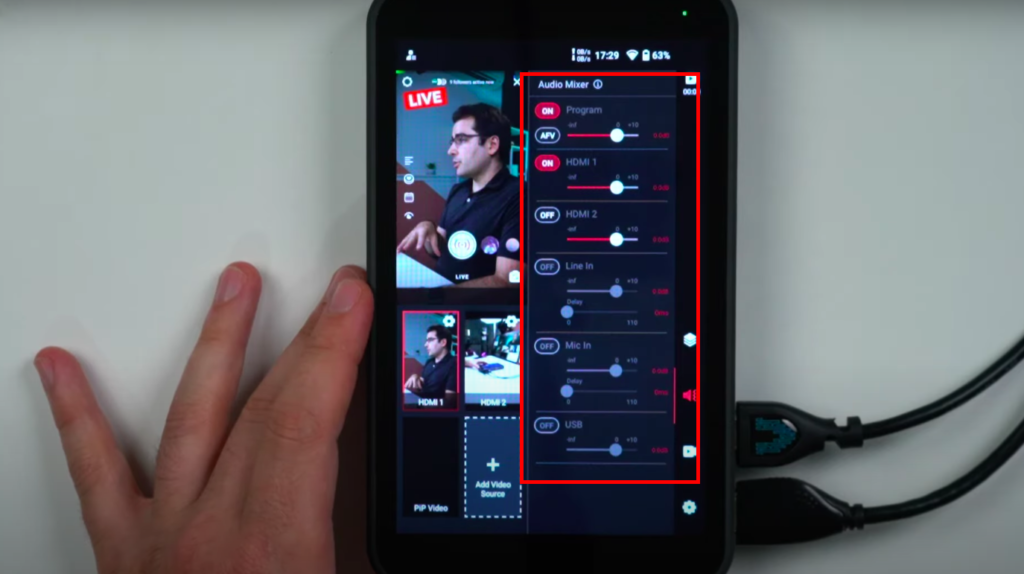
Now I want to spend a little bit of time on the audio tab. This is the second tab here with a little speaker icon. This is where you control what audio from each source is on the stream.
The main thing to keep in mind is whether you want to use the AFV or not. AFV stands for “audio follows video,” and it basically means that as you switch cameras, the audio will also switch to the corresponding camera. You’re only going to want to use this if you have good audio sources on each of your cameras. Most of the time I turn this off and instead I turn on specific audio sources myself.
So for example, like right now I’m running my audio into the main camera, so I actually want HDMI one to be on the whole time and AFV turned off and I’ll never use HDMI two because that’s this other camera, which I don’t have a microphone plugged into it. So it wouldn’t sound good. If I had a microphone plugged in directly into the audio jack, then I would use either the line or mic in. If you are bringing in audio over the line input, you can also set a delay and this is so that you can get your audio to match the sync of your video. Most HDMI cameras are going to have a delay on the output, so you’ll want to make sure you delay your audio to match it.
So that’s actually one of the reasons I prefer to actually run my audio always through a camera. That way, it’s just always in sync with at least the main camera.
Local Recording
The next tab to look at is this little one with the camera.
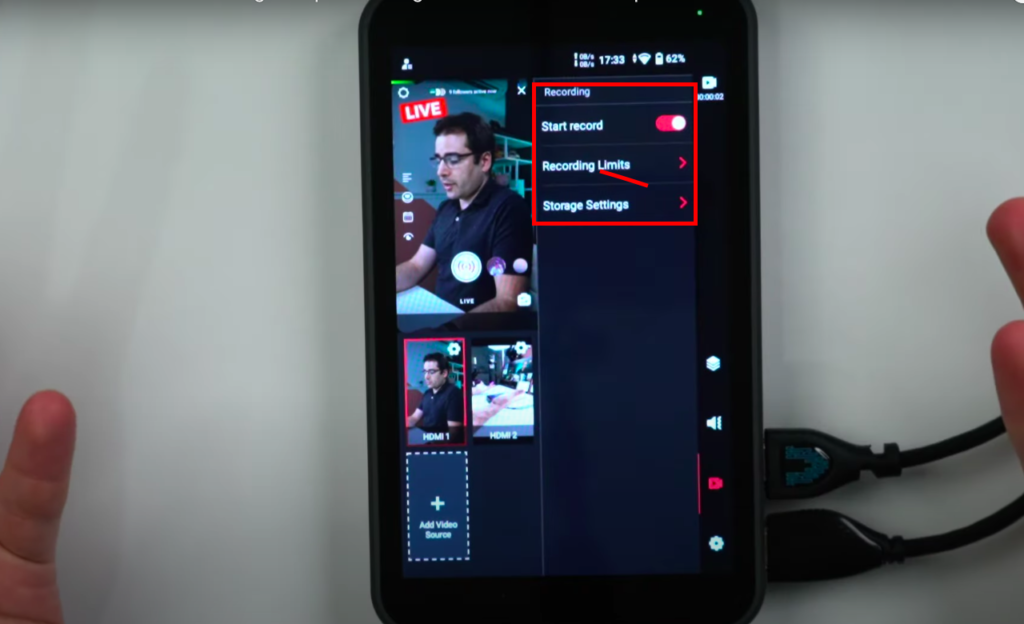
This is the recording tab. You can actually record a local copy of your live stream, which is really useful if you’re going to be live streaming on Instagram and then want to post it somewhere else later. I can actually record without even being live on Instagram. I’ll go ahead and just click start recording. It’ll tell you how much free space you have.
Hit start recording and now it’s recording. So I can see up here in the corner it’s telling me that this number is ticking up and this is showing me that it is in fact recording.
System Settings
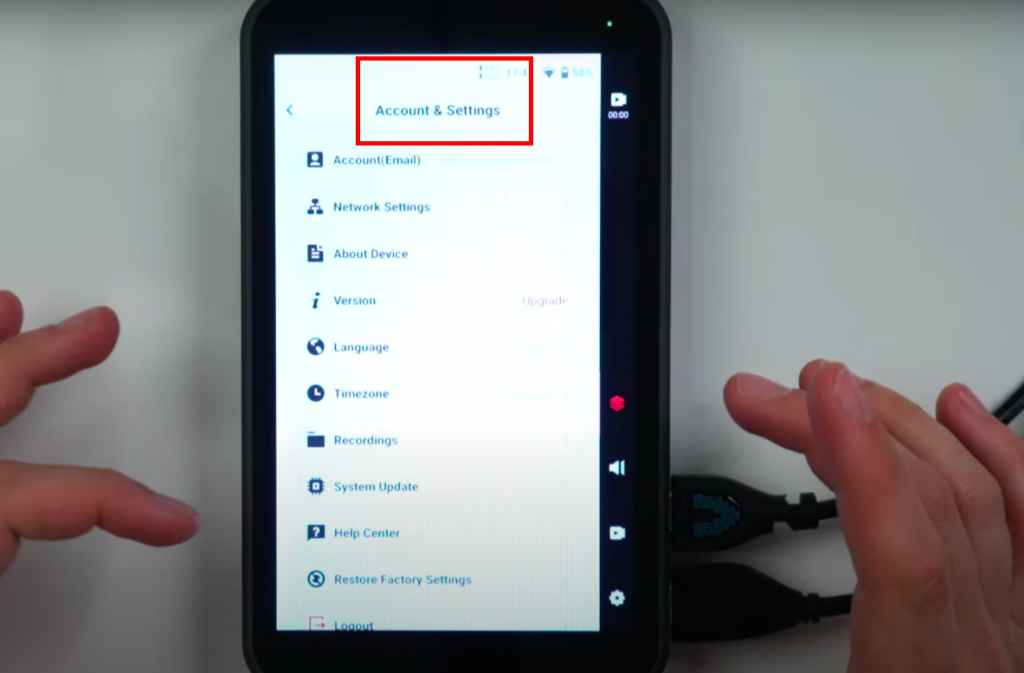
Let’s get to the main sort of Android system menu.
This is where you can do things like get on wifi or whether you want to use your ethernet or mobile or turn on your hotspot for tethering your SIM connection. This is also where you choose your time zone and language.
And to get back to the main screen, just tap on the arrow in the left and now you’re back onto the main Instream switcher view.
Firmware Updates
If you’ve used a YoloBox before, you’ll know that they’re actually really good about shipping new features in firmware updates extremely regularly. They are very quick to fix problems and they’re very quick to add new features as well. So I’m sure that will also hold true for this device as well.
They’ve already promised they’ll ship updates for new apps besides Instagram and TikTok, and I’m sure they’re going to add new features as well.
I don’t really know what they’ll add to it, but they’ve been surprising me and everybody else by shipping a bunch of new features to all three models of the existing YoloBox.
And they’re also very responsive to feedback. So if there’s something you know you want this device to do, please leave a comment on this video or go comment on any of their social media posts.
Final Thoughts+Further Reading
All the more brands and social media influencers are embracing vertical videos as part of the marketing strategy, the increase in engagement and brand awareness are self-explanatory. So join the vertical revolution with YoloLiv.

Turly is a contributor writer at YoloLiv. She produces articles including influencer’s reviews, tips and tricks in the audiovisual industry and YoloCast how-to tutorial to help you take the advantage of YoloLiv products to create and deliver better content.

